
Studio Upgrade: Creating an Art Space That Works
Artists can paint almost anywhere. Set us up with an easel and our materials outside in the garden and call it plein air painting. Find the corner of a room or space in a basement, and we can make it work. The truth is, once we’re involved in our art the surroundings dissolve as the paintings emerge. We artists are notorious for finding cheap spaces and creatively modifying them to suit our creative processes. Think of all the abandoned warehouses in cities that have drawn the attention of the arts crowd because of cheap rent, high ceilings, and spaces that can get a little messy. In this post, I’ll share the studio space I’ve put together and how I’m letting it evolve as I go to keep up with my work as demand for my art continues to increase.
DESIGN SPACE vs. ART STUDIO

My graphic design business is run successfully out of my office, which includes three large windows with a fabulous view overlooking a small lake. The water is nice distraction when I find myself on my computer for extended periods designing books for my clients. The view keeps me inspired! My art studio space, where all the painting happens, is just outside my design studio, across the hall. All of my abstract artwork you see on this website and in art galleries has been painted there.
Ideally, an art studio would be flooded with the natural light I have in my design studio, but this room across the hall with its one very small window works for me…for now. With advancements in lighting, finding daylight fixtures to flood the room with the light needed to see true color in my artwork is not a problem. As mentioned before, once I get absorbed in a painting the surroundings are a blur anyway.
ART STUDIO EVOLUTION
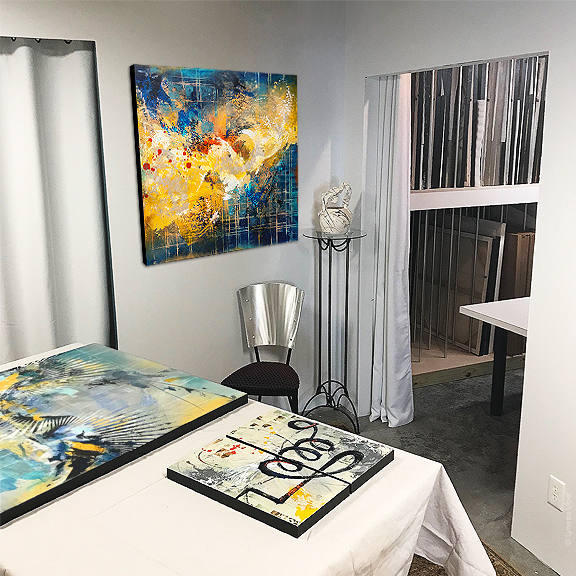
My art studio was first set up with the purchase of lighting, paint tarps, and minimal investment. I prefer painting flat on a wall because my work usually involves drips of color and the absolute vertical works best for me. Someday I’ll get a good easel, but for now, I prefer the simplicity of painting on the wall. The rest of my studio came together quickly when I first set it up because I already had things like flat files, a professional drawing table, and three large worktables to paint on. I pieced together scraps of carpeting to protect the floor in the room, and there it was… my dedicated art studio.
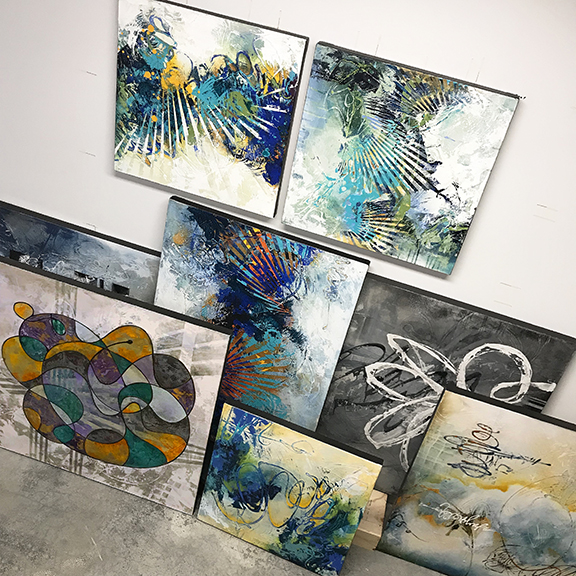
This year it became apparent that with my growing inventory of finished paintings, better art storage was needed. My old “system” was simply elevating the artwork off the floor, leaning it against a wall and stacking it face-to-face against each other with archival foam dividers between the paintings. Even though I currently have 24 paintings hanging in art galleries, I still have a nice inventory that needed to be better organized and more securely stored in my studio.

I worked with a contractor who devised a system that consisted of top-grade extra smooth plywood and metal pipes from the hardware store. He custom built the upper shelves to hold my paintings that are 36”x 36” and smaller; the lower shelves were specifically built to hold work up to 50”x 50” in size. There was also a side slot installed on the end to accommodate extra-large canvases. The steel pipes are fashioned in a way that they can be lifted and pulled out as needed to expand the widths of the storage slots. The pipes were used as the dividers because the rounded edges would roll with the paintings when pulling them in and out to avoid scratching the art. The shelves are 64” deep, so it’s possible to have paintings two-deep in each slot. Because some paintings might be stored out of sight behind others, I have dry erase board material tacked on the face of the shelves to write down the titles of the pieces in each slot. This simple solution makes it much easier to find particular pieces when requested by a gallery or buyer.
Once the art storage system was complete, it was time to upgrade the workspace. My contractor finished off two new walls in my studio to close off the art supply shelves and separate my work area from the art storage space. The walls are painted white and sound insulating curtains were installed to brighten the space, clear out the visual clutter and soften the environment. As part of the studio upgrade, a utility sink was also installed, and the top on one of my worktables was expanded to handle some of the larger canvases.

The long-term goal is for my studio to grow as my practice grows. One day I can see combining my design studio with my art studio into one big open area that shares the beautiful lake view. But for now, I have what I need so I’m set to pull out my materials and get creative in my fabulous new space!
If you’re an artist what is your idea of the perfect place to paint? Do you have a great art storage solution? Please share your ideas below!
More Articles Like This
Comments (0)